This is the second article in a series that explores the idea of creating a headless application, without the luxury of Sitecore Headless Services Module (Sitecore JSS). The first article looked at creating a custom layout service.In this article we will look at creating a headless application to consume the layout service.
Now that we have a layout service to provide the data about our pages, we need to build a front end application to consume the information. For the purposes of this demo, I will spin up a vanilla sitecore instance and import the assets and data from this example MVC project: Personalisation Demo Site - Dean OBrien and add the layout service module. The goal will be to output a wire frame page showing how each component sits within the various placeholders.
Supporting code for this article can be found here:
https://github.com/deanobrien/nextjs-consume-layout-service-for-sitecore
Choosing a Front End Framework
When looking at headless technologies used with Sitecore, the most popular framework seems to be NextJS. Therefore it made sense to create the demo application using that framework. As a complete NextJS novice, I needed to learn the basics! Luckily you can find a comprehensive set of tutorials on their website: https://nextjs.org/learn
With only the information from the above tutorials, I set about trying to create an application to consume the layout service.
Note: Just as a word of advice - NextJS recently switched from "Pages" to something called "AppRouter". When searching for answers to any issues, be sure to check that the solution is current and targeting AppRouter. I found it very confusing sifting between the two. There are a lot of terms like like getStaticProps etc that simply are not relevant in the latest version of NextJS (14)
Scaffold a basic NextJs App
The NextJs website recommends using pnpm package manager. You can do this using this command:
npm install -g pnpmThen create the folder to host the application and navigate to it. Then run this command:
npx create-next-app@latest nextjs-boilerplateWhen prompted, select the following:

As the name suggests, this scaffold the bare minimum files needed to run a NextJs app. To make things a bit neater, you can copy the contents of the boilerplate folder to your root directory.
With the above in place, you should then be able to run the following command:
npm run devand then find a single page site running at localhost:3000.
Building out our basic app
The steps required to build up the app to start reading from the layout service are as follows:
- Adddata fetching functions
- Add a single catch all dynamic route
- Add core components
- Add custom components
- Add some simple css to highlight placeholders and components
Add data fetching functions
Create a new folder in App directory called lib, then create a new file called data.ts. To this add the following functions.
getData - used to call our layout service
async function getData( pathname: string) {
	if(!pathname){
		pathname = "/"
	}
	let fetchUrl='https://<your-domain>/sitecore/api/layoutservice/get?site=website&lang=en&apiKey=xxx&path='+pathname
	const res = await fetch(fetchUrl)
	if (!res.ok) {
		throw new Error('Failed to fetch data')
	}
	return res.json()
}
fetchComponentsForPlaceHolder - used to filter out components
export const fetchComponentsForPlaceHolder = async (placeHolderName: string, newPath: string): Promise<any[]> => {
	try {
		const data = await getData(newPath)
		return data.Route.Components.filter((item: any) => item.PH.endsWith(placeHolderName))
	} catch (error) {
		throw ('Error on placeholder '+placeHolderName+' :'+error);
	}
}
getPath - used to read the dynamic route from the url
export const fetchPath = async (slug: any): Promise<string> => {
	try {
		var pathName=''
		if (slug && slug[0]) {
			pathName += '/' + slug[0]
		}
		if (slug && slug[1]) {
			pathName += '/' + slug[1]
		}
		if (slug && slug[2]) {
			pathName += '/' + slug[2]
		}
		if (slug && slug[3]) {
			pathName += '/' + slug[3]
		}
		if (slug && slug[4]) {
			pathName += '/' + slug[4]
		}
		return pathName;
	} catch (error) {
		throw (error);
	}
}
Add a single catch all dynamic route
In the App directory, create another folder named [[...slug]] . Inside that folder, create a new file called page.tsx and add the following detail:
'use server'
import PlaceHolder from '../Components/Core/PlaceHolder';
import { fetchPath } from '@/app/lib/data';

const Page = async({params: {slug}}) => {
  const pathName = await fetchPath(slug)
    return (
		<>
			<PlaceHolder placeHolderName="BootStrap-Header" pathName={pathName} />
			<PlaceHolder placeHolderName="bootstrap-content" pathName={pathName} />
			<PlaceHolder placeHolderName="bootstrap-footer" pathName={pathName} />
		</>
    );
};

export default Page;
This acts as an Optional Catch All Segment (See Routing: Dynamic Routes ) and will be the entry point for any route that is navigated too. The slug param can only be accessed from a page level component, we pass that data into one of our data functions to extract the dynamic route, then pass that to all components (first of which is the PlaceHolder component).
Add core components
There are two core components needed to be able to read the incoming data from the layout service. These are the Placeholder component, which acts in a similar way to placeholders in normal Sitecore. It fetches all components (from the collection returned from API) that have a placeholder (PH) ending the same as the passed in placeHolderName.
App/Components/Core/Placeholder.tsx
import { fetchComponentsForPlaceHolder} from '@/app/lib/data';
import DynamicComponent from './DynamicComponent';

const PlaceHolder = async ({ placeHolderName, pathName }: { placeHolderName: string, pathName: string }) => {

	if (pathName != "/_next/static/css/app/styles.css.map" && !pathName.includes("/js/") && !pathName.includes("/css/") && !pathName.includes("/img/")) {

		const components = await fetchComponentsForPlaceHolder(placeHolderName, pathName);
		return (
			<>
				<div className="placeholder" key={placeHolderName} id={placeHolderName}>
					<p>[PlaceHolder: {placeHolderName}]</p>
					{
						components.map((c) => {
						return (
							<>
								<DynamicComponent pathName={pathName} uid={c.UID} componentName={c.ComponentName} key={c.UID} />
							</>
						);
					})
					}
				</div>
			</>
		);
	};
}
export default PlaceHolder;
Then it iterates through each of those and returns a DynamicComponent - passing to that pathName, uid and componentName.
The DynamicComponent needs updating to reflect all of the custom components (discussed later). It acts as a case statement, returning the custom component that matches the passed in componentName.
App/Components/Core/DynamicComponent .tsx
import BootStrapAlbum from '../Custom/BootStrapAlbum';
import BootStrapColumn from '../Custom/BootStrapColumn';
import BootStrapRow from '../Custom/BootStrapRow';

... add an import statement for every custom component ...

export default async function DynamicComponent({ pathName, uid, componentName }: { pathName:string, uid: string, componentName: string }) {
  if(componentName==='BootStrapAlbum')
  {
	  return (<BootStrapAlbum pathName={pathName} uid={uid} /> );
  }

  ... lots more switch statements ...

  else if(componentName==='BootStrapColumn')
  {
	  return (<BootStrapColumn pathName={pathName} uid={uid} /> );
  }
  else if (componentName === 'BootStrapRow') {
	  return (<BootStrapRow pathName={pathName} uid={uid}  />);
  }
}
Add custom components
Navigate to App/Components/ and add another folder called Custom. In here create a new file for every component (rendering) that you currently have in your MVC application. Their name should match the component name and also match the function being exported. Example below:
BootstrapAlbum.tsx
export default async function BootStrapAlbum({ pathName, uid }: { pathName: string, uid: string }) {
	return (
		<div className="component">
			<p>UID: {uid}</p>
		</div>
	);
}
If the component previously contained a static or dynamic placeholder, then you should import the PlaceHolder component and add it as the example below:
BootStrapColumn.tsx
import PlaceHolder from '../Core/PlaceHolder';
export default async function BootStrapColumn({ pathName, uid }: { pathName: string, uid: string }) {
	return (
		<div className="component">
			<p>UID: {uid}</p>
			<PlaceHolder pathName={pathName} placeHolderName="bootstrap-column" />
		</div>
	);
}
Add some simple css to highlight placeholders and components
To keep this demo as simple as possible, our components dont output any formatted data, other than a <div> block with component or placeholder class names. If we add some simple css to the Global.css file, it should transform the page slightly to help demonstrate how the various components have been sorted to display in their respective placeholders in the page.
Locate globals.css in the App directory and add the following:
.placeholder {
	margin:10px;
	padding:10px;
	border: 2px dashed #00f;
}
.component {
	margin:10px;
	padding:10px;
	border: 1px solid #f00

}
Now, when you run:
npm run devYou should see something similar to:
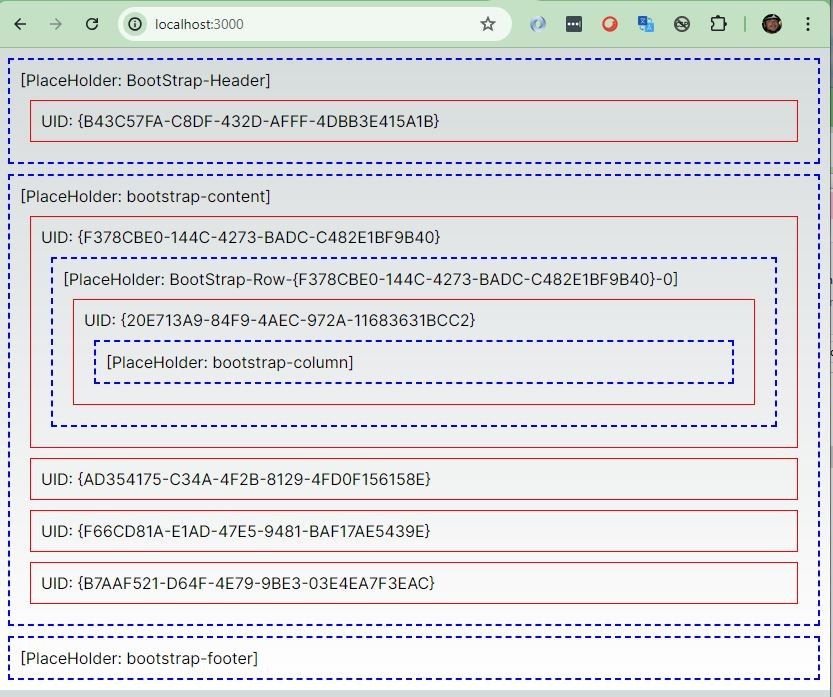
In a more complex example, we would instead output more meaningful HTML interspersed with data from the various fields for each component.
Summary
In this article we looked at how to create a basic NextJs Application and then link it up to our layout service. We demonstrated its connectivity by outputting simple components on a page, within their respective placeholders.
In the next article, we will look at building out some more advanced functionality to get different types of data needed for our components.