I would like to introduce the Application Insights for Sitecore Module! Some of the key benefits of this module are as follows:
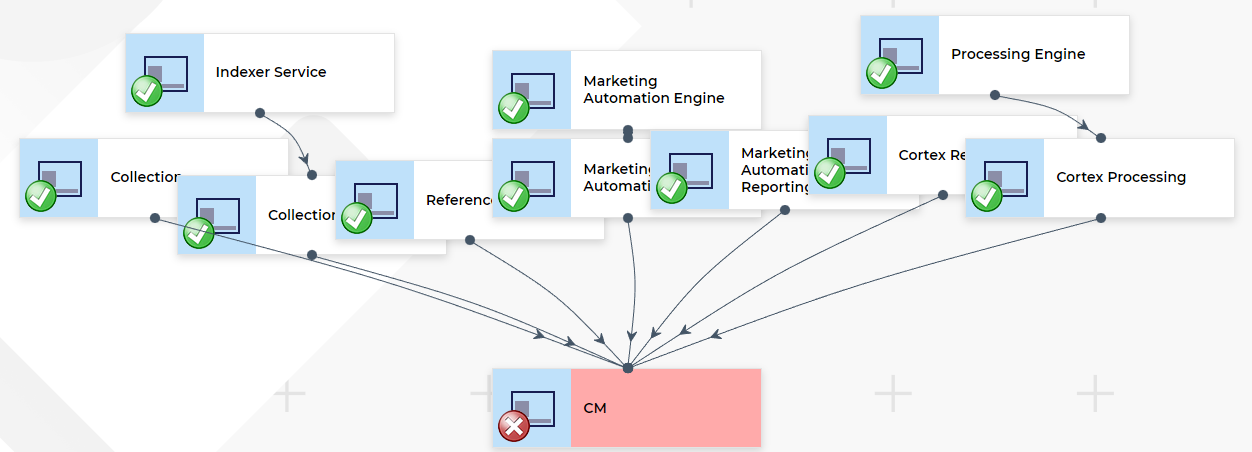
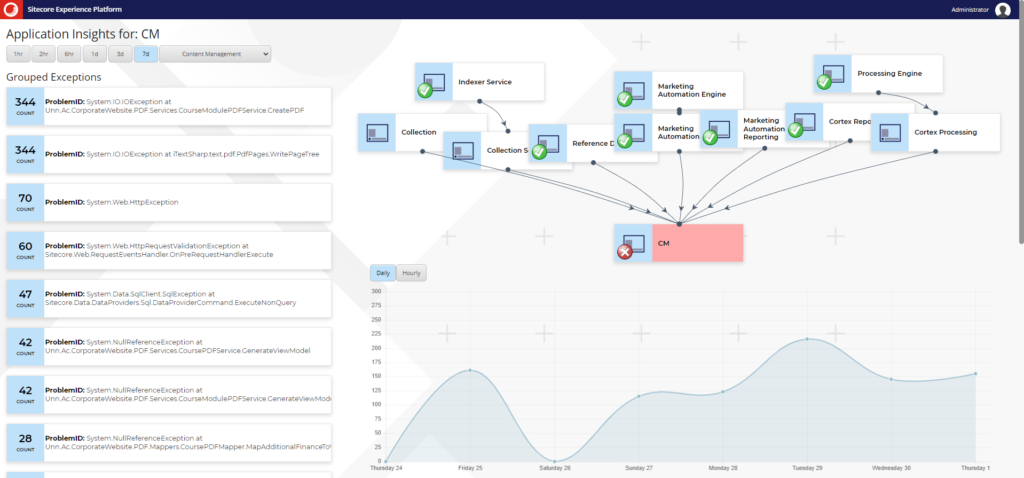
- Quickly view the health of ALL Sitecore / Xconnect instances on one screen.
- Show a list of all exceptions happening on a given instance and their frequency
- Group exceptions by ProblemId and then by InnerMostMessage
- Track exceptions over time to see when they began or at what times during the day they occur
- View logs from as far back as the moment you start tracking them
- Entra Authentication (more info Switch to Entra Auth)
- Add the following Alerts (more info Alerting added to App Insights module)
- Exception Contains String
- Exception Spike
- Schedule Task Inactivity
- Cron Task Inactivity
- Custom Event
- Webpage Down
- Service Bus Queue Exceeds
- AI Alerts
- Azure Devops / TFS Integration
- AI Summary of all Exceptions over given period
- Ask AI any question about all exceptions in given period
- AI Analysis and recommendation based Exception and Custom code (from your repo)
- Generate Work Items or PRs based on Recommendations
- AI Alerting - this compares recent exceptions against last X days and alerts if it finds anything 'out of ordinary' (all prompts are configurable)
Important Update
The latest version of this module has been updated to use Microsoft Entra Authentication. For details on how to setup the module up please see this link: Application Insights Module: Switch to Entra Auth
How to install
Go to https://github.com/deanobrien/application-insights-sitecore-module and download the package file (i.e. Application Insights Module v3.0.zip - this is compatible with Sitecore 10.3+). [V3 has been UPDATED as of October 2025]
Important: Installing module will cause temporary crash - you will need to make minor change to web config to fix it (details below).
Setup your database
- Access your database server via SSMS
- Right click databases node => Create New Database (call it 'ApplicationInsights' or similar)
- Download CreateTables.txt and CreateSPs.txt from GitHub Repo
- Open new query and run SQL from within CreateTables.txt
- Open new query and run SQL from within CreateSPs.txt
- Create a user with access to read/write
- Add a new connection string to you your Sitecore instance called ApplicationInsights
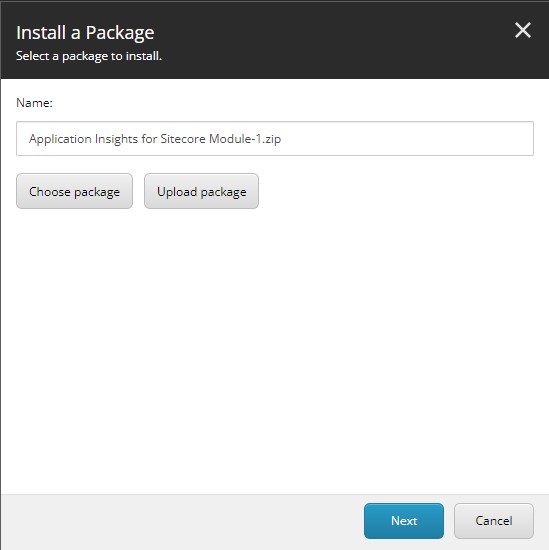
Install Sitecore Package
- Go to desktop
- Development tools
- Installation Wizard
- Upload Package
- Select package from above
- Install
Add Binding Redirect to Web.Config
Unfortnately in when installing the module, you may find Sitecore crashes! This is because of three DLLS that have been updated (as a result of needed in Aziure.Core). As a result, you will need to add the following to your web config.
< dependentAssembly >
  < assemblyIdentity name="Azure.Core" publicKeyToken="92742159e12e44c8" culture="neutral" />
  < bindingRedirect oldVersion="0.0.0.0-1.43.0.0" newVersion="1.43.0.0" />
< /dependentAssembly>
< dependentAssembly>
  < assemblyIdentity name="System.Diagnostics.DiagnosticSource" publicKeyToken="cc7b13ffcd2ddd51" />
  < bindingRedirect oldVersion="0.0.0.0-6.0.0.1" newVersion="6.0.0.1" />
< /dependentAssembly>
< dependentAssembly>
  < assemblyIdentity name="System.Text.Json" publicKeyToken="cc7b13ffcd2ddd51" />
  < bindingRedirect oldVersion="0.0.0.0-6.0.0.9" newVersion="6.0.0.9" />
< /dependentAssembly>
Note: The reason for the binding redirects is that the minimum version of Azure.AI.OpenAI (2.0.0) requires Azure.Core 1.43. Which in turn has a dependency on System.Diagnostics.DiagnosticsSource >= 6.0.0.1 and System.Text.Json > = 6.0.9. Therefore its not possible to use the OpenAI library without changing some default packages.
Configure Azure Entra Access
Follow the instructions on this page (Application Insights Module: Switch to Entra Auth) to get the following:
- Enter Client ID
find this in overview screen for Entra App - labelled 'Application (client) ID' - Entra Client Secret
You should have saved this in step 10 of Register an App - Tenant ID
find this in overview screen for Entra App - labelled 'Directory (tenant) ID'
Using the same instructions, find the Application IDs for each of the resources you wish to monitor.
Add Application ID to Sitecore items.
- Go to Content editor
- Then: Sitecore/settings/modules/Application Insights/CM
- Insert Application Insights ID and Secret
- Do the same for all applications listed in that area
- Add any other applications you wish and configure their dependencies (this controls how applications are linked in the flow chart)
Configure Azure Devops / TFS Access
Access Azure Devops and find the following information:
- TFS Organisation - this is your top level ID (eg. https://xxxxx.visualstudio.com)
- TFS Project Id - this is the first screen you click through to from root (eg. https://xxxxx.visualstudio.com/yyyyyyy)
- TFS Repository Id - A project can contain multiple repositories. Select the relevant one and enter the name of it here.
- TFS PAT Token - Click User settings (top right) => Personal Access Tokens (PAT) => New Token
Input the above into the settings item here: /sitecore/system/Modules/ApplicationInsights
Deploy a model in OpenAI Studio
- Deploy a model in Open AI Studio (i.e. gpt-4) using this guide: https://learn.microsoft.com/en-us/azure/ai-services/openai/how-to/create-resource?pivots=web-portal
- Insert at least one Deployed Model in this location and add Name, Endpoint and Key:/sitecore/system/Modules/AI Language Assistant/Deployed Models
- Ensure the Default Model matches the name of the one you just added here: /sitecore/system/Modules/AI Language Assistant
Publish
Before running the import, make sure that all of the settings that you have added are published. The task takes all of its configuration from the web DB, so if not present then it will fail.
Run the Import Task
As part of the installation, there should have been a new Task command and schedule added here:
/sitecore/system/Tasks/Commands/Application Insights/Retrieve logs and store in SQL
/sitecore/system/Tasks/Schedules/Application Insights/Retrieve logs and store in SQL
Make sure the task has run, before trying to view the GUI of the module. You can do this by deleting the Last Run field on the schedule and saving. Keep checking, within 10 minutes you should see that the task has ran and the Last Run will have been updated again.
Note: If you experience any problems, check that both the applications and also the Logs table are getting populated. You need to have both Daily and Hourly logs showing in the logs table.
Access the Module
- Go to dashboard
- Application Insights to view data