This is the fifth article in a series that explores the idea of creating a headless application, without the luxury of Sitecore Headless Services Module (Sitecore JSS). It is a continuation from NextJs Application to replicate the MVC equivalent where we used functionality from previous posts to build a NextJS that exactly matched the Sitecore MVC version of the site.
In this next article, we will look at what is required to add authentication to our application, by linking up to Sitecore Identity Server (via Auth.js).
Supporting code for this article can be found here: https://github.com/deanobrien/nextjs-personalisation-for-sitecore
- Install Auth.js and create a secret
- Configure Auth.js and add middleware
- Add an optional catch all to handle the Auth endpoints
- Add buttons to handle logging in and logging out
- Add the auth button components to an existing component
- Conditionally show some content if the user is logged in
Install Auth.js and create a secret
To begin adding authentication to your application, you need to first of all install Auth.js by running this command (this installs the beta version of NextAuth.js, which is compatible with Next.js 14):
npm install next-auth@betaThen generate a secret key and add it to your .env.local file. You can do this by running:
npx auth secretConfigure Auth.js and add middleware
In the root of your application add a file called auth.ts and paste in the following:
import NextAuth from 'next-auth';
import DuendeIDS6Provider from "next-auth/providers/duende-identity-server6"

const providers: Provider[]  = [
	DuendeIDS6Provider({
		clientId: "SitecoreCredentials",
		clientSecret: "<insert-client-secret>",
		issuer: "https://<your-identity-server-domain>",
		authorization: "https://<your-identity-server-domain>/connect/authorize?scope=openid+sitecore.profile+email+profile",
		async authorize() {return true;},
		async profile(profile, tokens, email) {
			const response = await fetch(
				`https://<your-identity-server-domain>/connect/userinfo`,
				{ headers: { Authorization: `Bearer ${tokens.access_token}` }, scope: "sitecore.profile" }
			)
			const json = await response.json()
			return {
				id: profile.sub,
				name: json.first,
				email: json.email,
				access_token: tokens.access_token
			}
		},
    })
]
This imports the Next-Auth (renamed Auth.js) module and also the 'duende' sub provider, which is the underlying provider behind Sitecore Identity Server. Next define an array of providers (or in our case just duende).
Note: I found the only way to get the sitecore.profile scope to returned was to add it directly as a parameter to the authorization url.
You will notice that we also make a secondary call to the “user info” endpoint (passing in the access token) to get the details we need (i.e. first name and email - from sitecore.profile).
The above will only work if you have a corresponding client configured within sitecore identity server. Something like this added to identityserver.xml:
<CredentialsClient>
	<ClientId>SitecoreCredentials</ClientId>
	<ClientName>SitecoreCredentials</ClientName>
	<AccessTokenLifetimeInSeconds>3600</AccessTokenLifetimeInSeconds>
	<IdentityTokenLifetimeInSeconds>3600</IdentityTokenLifetimeInSeconds>
	<AllowAccessTokensViaBrowser>true</AllowAccessTokensViaBrowser>
	<RequireClientSecret>true</RequireClientSecret>
	<AllowedGrantTypes>
		<AllowedGrantType1>authorization_code</AllowedGrantType1>
	</AllowedGrantTypes>
	<AllowedCorsOrigins>
		<AllowedCorsOriginsGroup1>https://<your-nextjs-app></AllowedCorsOriginsGroup1>
	</AllowedCorsOrigins>
	<RedirectUris>
		<RedirectUri1>{AllowedCorsOrigin}/auth/callback/duende-identity-server6</RedirectUri1>
		<RedirectUri2>{AllowedCorsOrigin}/api/auth/callback/duende-identity-server6</RedirectUri2>
	</RedirectUris>
	<PostLogoutRedirectUris>
		<PostLogoutRedirectUri1>{AllowedCorsOrigin}/identity/postexternallogout</PostLogoutRedirectUri1>
		<PostLogoutRedirectUri2>{AllowedCorsOrigin}/signout-callback-oidc</PostLogoutRedirectUri2>
	</PostLogoutRedirectUris>
	<AllowedScopes>
		<AllowedScope1>openid</AllowedScope1>
		<AllowedScope2>profile</AllowedScope2>
		<AllowedScope3>email</AllowedScope3>
		<AllowedScope4>sitecore.profile</AllowedScope4>
		<AllowedScope5>sitecore.profile.api</AllowedScope5>
	</AllowedScopes>
	<ClientSecrets>
		<ClientSecret1>your-client-secret</ClientSecret1>
	</ClientSecrets>
</CredentialsClient>
You will see that we also define redirect URI which will be used by our NextJs application (i.e. auth/callback/duende-identity-server6).
Next, you need to define the NextAuth config. To do this, paste this remaining code into Auth.ts
export const { handlers, auth, signIn, signOut } = NextAuth({
  theme: { logo: "https://authjs.dev/img/logo-sm.png" },
  basePath: "/auth",
  providers,
  session: {
	strategy: 'jwt',
	maxAge: 30 * 24 * 60 * 60, // 30 days
},
  callbacks: {
	authorized({ auth, request: { nextUrl } }) {
		console.log('norm auth')
		// You could add logic here to restrict access to soecific pages
		// See https://nextjs.org/learn/dashboard-app/adding-authentication
		return true;
	},
	jwt: async ({ token, user, account }) => {
		if (account && account.access_token) {
			// set access_token to the token payload
			token.accessToken = account.access_token
		}
		return token
	},
	async session({ session, token}) {
       return { ...session, token: token.accessToken }
     },
  }
}) satisfies NextAuthConfig;
You will see in the above code that we are setting a custom basePath to “/auth“. This is the route to our exported Auth functionality (more on this later). We import the providers array from earlier and also specify that we will store session in JWT cookies (rather than DB for example) and the lifetime of those cookies.
Finally we define a number of callback functions.
The authorized function is called the the NextJs middleware, prior to loading any route. You can use this to restrict which pages require authorization (See https://nextjs.org/learn/dashboard-app/adding-authentication).
The jwt callback checks to see if the user has been logged in and then adds the access token to the response before returning the object.
The session callback overrides the default behaviour and adds the bearer token to the session. This is important, because if we want to call the protected Layout Service endpoint, we need to pass the bearer token into the call. With out this available in the session, we would be able to authorize against the endpoint.
Next you need to add a file called middleware.ts and paste in the following:
import NextAuth from 'next-auth';
export { auth as middleware } from "@/auth"
export const config = {
  // https://nextjs.org/docs/app/building-your-application/routing/middleware#matcher
  matcher: ['/((?!api|favicon|_next/static|_next/image|.*\\.png$).*)'],
};
Add an optional catch all to handle the Auth endpoints
Create a folder called Auth in the app directory. Inside that add another folder called [...nextauth]. Inside that folder create a file called route.ts and paste in the following:
import { handlers } from "../../../auth"
export const { GET, POST } = handlers
This sets up a catch all route, so that any calls to http://localhost:3000/auth/xxx will be handled by this file. I believe (not entirely sure…) this exposes the default endpoints (like /auth/callback/duende-identity-server6) provided by the Auth.js module.
Note: This new route matches the basePath that we defined above.
Add buttons to handle signin and signout
Create the following two files and paste in the following. These use server actions to trigger the default SignIn/SignOut functions that we have imported from NextAuth.
SignInButton.tsx
import { signIn } from "../../../auth"
export default function SignInButton() {
  return (
    <form
      action={async () => {
        "use server"
        await signIn("duende-identity-server6")
      }}
    >
      <button type="submit">Signin with DuendeIDS6Provider</button>
    </form>
  )
}
Note: pay close attention to the spelling and case of the provider (i.e.duende-identity-server6). Anything other than this will return exceptions. If you are using a different provider and are unsure of the correct spelling, you might want to look at this page Auth.js | Signin . I modified this to output the provider.id to console to find the correct spelling.
SignOutButton.tsx
import { signOut } from "../../../auth"
export default function  SignOut() {
  return (
    <form
      action={async () => {
        "use server"
        await signOut()
      }}
    >
      <button type="submit">
        Sign Out..
      </button>
    </form>
  )
}
Add the auth button components to an existing component
Find a component that you wish to add the log in/out functionality too and add the following (In our example I added it to BootstrapPrimaryNavigationv2.tsx).
const session = await auth()
let authButton = <></>;
if (!session?.user){
	authButton= <SignInButtonDuendeButton/>
} else {
	authButton=<div><span className="username"> {session.user.email} <SignOut /></span></div>
}

return(
   ... ommitted ...
   {authButton}
   ... ommitted ...
);
This will show the signin button if logged out and sign out (together with email) if logged in.
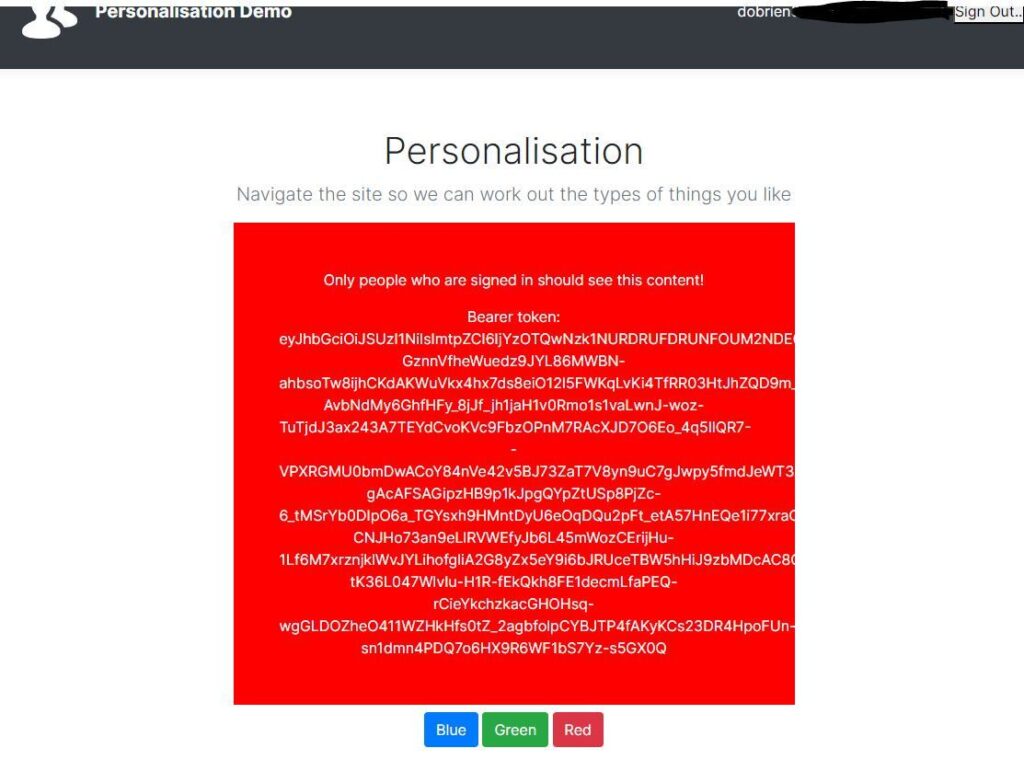
Conditionally show some content if the user is logged in
In order to check if a user is logged in, we simply need to import the session and check is a user is defined. In our example, we added this to the BootstrapJumbotron.tsx component
const session = await auth()
let protectedContent =<></>;
if (session?.user)
{
	protectedContent =
	<div className="protectedContent">
		<p>Only people who are signed in should see this content!</p>
		<p>Bearer token: {session.token}</p>
	</div>
}
return(
   {protectedContent}
);
You will see in the example above, we are also outputting the bearer token to the page. This is a useful test to confirm that a bearer token is available in the session. Reason being, we may need to send that in any calls to our protected Layout Service endpoint.
If everything went as expected, you should now see something like the below when you sign in: